Showing posts with label Historical Articles. Show all posts

10/18/11

Ginkel Heath – Propaganda and Reality in MARKET-GARDEN

It has been very quite from this side over the last six months. Mainly due to loads and loads of work I haven´t had the time to write anything. There´s however, one article which was published some time ago on Armchairgeneral.com and which I didn´t re-post here.

Ginkel Heath – Propaganda and Reality in MARKET-GARDEN

During the afternoon of September 18th, 1944—day two of Operation Market-Garden, the Allied airborne attempt to seize bridges at Arnhem, Holland—a cameraman of Propaganda Kompanie Benchter runs for cover in the woods adjoining SS-Captain Helle’s battalion headquarters. From his position, overlooking Ginkel Heath—Drop-Zone Y for the incoming Allied paratroopers—he films the hotly contested landing of the British 4th Parachute Brigade.
That unexpected air-landing and a perfectly timed counterattack by the 7th Kings Own Scottish Borderers during the engagement proved a serious setback to the German effort to destroy the Allies’ attempt to establish a bridgehead north of the Rhine Rive. This, however, is not what the German propaganda department wanted Herrenvolk on the homefront to believe
Propaganda
The German Propaganda department used images shot by the aforementioned cameraman quite extensively in their weekly newsreel from the front, Die Deutsche Wochenschau.


It is interesting to see how events around the cameraman unfold, and how the images he shot were used to create a fictional interpretation of the Arnhem battle. The scenes in this particular newsreel were very rare this late in the war: German units in action, Allied planes burning and crash-landing, and paratroopers descending amidst German tracers and bursts of shrapnel.
These may have been the first pictures of success that could be used by the German propaganda department following the disaster in Normandy and the headlong retreat to the border of the Reich. It’s no surprise, therefore, this footage was fully exploited in order to keep up the sagging German morale. A narrator described the hotly contested Allied landings in the Arnhem region by saying, “hundreds of paratroopers are killed before they reach the ground” and “thousands have been killed near the landing zones.” This interpretation of events is, however, in stark contrast with what really happened at Ginkel Heath.

History
So, what do we really see in this newsreel?
First of all, what we witness are not the initial landings on September 17th but those of the second wave on the 18th. The drop-zone (DZ) was under direct fire, but the Germans did not control the entire perimeter as suggested by the narrator. Brigadier John W. Hackett’s 4th Parachute Brigade, numbering 2.000, jumped into a hail of fire and suffered considerable casualties, but again, not as crippling as suggested. Neither was the battle for Ginkel Heath a victory for the Germans; it was in fact, almost a disaster. In short, everything about the narrator’s story is wrong.
After the initial landings in the afternoon of September 17th a division- sized Kampfgruppen, Division von Tettau, was scraped together from the units stationed west of Arnhem. Their mission was to contain the threat and close the drop zones (DZs) and landing zones (LZs). At dawn the next day six battalions—SS-guard, SS-training, Luftwaffe, Kreigsmarine and Wehrmacht units—advanced from Wageningen in the direction of Oosterbeek and Arnhem beyond. After initial failure, the DZ at Ginkel Heath was re-captured and those to the south threatened, with the British troops pushed back over a five-mile front. By early afternoon most of Ginkel Heath, rather flat and completely open terrain surrounded by woods to the south and west, had been cleared. SS-Wachbattalion III Nordwest, commanded by SS-Captain Helle, formed up to chase the 7th Kings Own Scottish Borderers (7 KOSB) from the eastern treeline and their last foothold on the heath. In the midst of these preparations, at 1500 hours, a buzzing sound filled the sky: the aerial armada bringing in the second wave of Major General Robert Urquhart’s 1st Airborne Division was approaching. This was the signal the British on the ground had been waiting for. As the German cameraman ran and Helle’s NordwestSS-battalion watched in awe, the 7 KOSB attacked to sweep clean Drop-Zone Y just prior to the landing.

SS-Wachbattalion III Nordwest was a small unit of six guard companies and one heavy-weapons platoon, 400–600 strong. It had been formed in 1942 to guard the concentration camps spread throughout Holland and was composed of collaborating Dutch volunteers wishing to avoid the Arbeiteinsatz (forced labor), along with Ukrainians and recuperating German wounded. Even by the low standards of the garrison of Holland, the members of the battalion were physically unfit and lacked the training, equipment and morale necessary for front-line duty. Nevertheless, on the 17th, they had been close to the drop-zones west of Arnhem and thus formed a part of Division von Tettau. Their initial actions showed their lack of training as they attacked down a road in column, suffering heavy casualties. A subsequent concerted attack with neighboring units in the early afternoon had more success and swept the 7 KOSB from Ginkel Heath, though suffering heavy casualties yet again. It was these six bloodied companies that now found themselves seriously outnumbered and assailed from the front and from the sky.

Victory turns into Defeat
As the Propaganda Kompanies‘ cameraman was filming the action Batallion Nordwest fell apart. Most companies fled right away. Only two companies (3rd and 4th) and Hauptscharfuhrer (Sergeant-major) Einenkel’s heavy-weapons platoon formed “hedgehogs” and something of a coherent, all-round defense. SS-Sturmbannfuhrer (Major) Paul A. Helle panicked, ran out the back door of his headquarters and fled northwards. Many of his troops did the same and fled or surrendered even before the last of the paratroopers had landed on the heath. The cameraman had a good view of the Dakota transport planes overhead, some of which had been hit by flak, and the subsequent descent of the paratroopers. Even though it was not as murderous as Die Deutsche Wochenschau wished those watching its newsreel to believe, for the paratroopers it still must have been hell to descend into the small-arms fire of 3rd and 4th company intermixed with 20mm flak and mortar and machine-gun fire from the heavy-weapons platoon.
Leonard Derek Moss, 4th Parachute Brigade, remembered his jump into this cauldron of fire: Bullets whizzed past from the ground and anti-aircraft shells continued to explode all around. The ground was rushing upwards quickly. 400 feet … It was chaos below. Men ran all over the place avoiding enemy fire. Mortar shells exploded throwing up clouds of smoke and dirt while fires burned out of control … Paratroopers were landing all around. It was chaos as heavy machine gun fire raked the area from concealed German positions in the woods. Men were being hit, wounded, killed. Gunfire exploded nearby, ripping into the ground, throwing up puffs of dirt. The air was alive with flying lead.
Trying to fight off attacks from all sides, the remnants of Nordwest‘s 3rd and 4th company and Einekel’s platoon gave up their position and attempted a haphazard fighting withdrawal to the north. The cameraman must have joined them after he had shot several minutes of footage—showing much more courage then most soldiers of SS-Battalion Nordwest had shown. He managed to capture unique material, and a full minute of his footage was used in that week’s Wochenschau to show those at home images of German soldiers fighting valorously, tenaciously—and victoriously, something far from the reality of what was actually happening during the time the cameraman was filming.

The Aftermath
It was all over in a matter of minutes. Had the 7th KOSB not counterattacked as the second wave of paratroopers arrived, the German propaganda might well have been right. General Hackett thanked the 7 KOSB “for getting the paratroopers such a good landing.” Still, during the landing, the 4th Parachute brigade lost over 200 soldiers, 10% of its strength. The 7 KOSB and 4th Parachute Brigade never reached their intended target, the Arnhem bridges, and were pushed back into the Oosterbeek perimeter along with most of the 1st British Airborne Division. Relief would come too late and most of them had to surrender.
SS-Wachbatallion Nordwest had ceased to be an effective unit, losing over half its number, either killed, wounded or taken prisoner. Helle’s adjutant: SS-Untersturmführer Albert Naumann, gathered what was left. Incorporated into an experienced SS-regiment, the battalion suffered heavy casualties yet again on the 22nd and was subsequently withdrawn from combat.
The battle for Ginkel Heath had only been a side note to the much larger spectacle at Oosterbeek and Arnhem, but a minute of historic footage remains to remind us of this bloody fight—which was not what the German propaganda purported it to be.

Click here to view a BBC animated map of the battle for Arnhem.

1/30/11

1942, Invasion-Malta Board game

Last week I found an unexpected copy of the World at War magazine in my postbox. Now I don't mind getting magazines for free so I quickly scanned through the contents of this WWII-themed magazine and my interest was soon caught by an article about the Axis Invasion of Malta, 1942; an invasion which never took place. “The war in Europe might've been much different had the Axis 'pulled the trigger' on their detailed plan to conquer Malta.”

Not only was the detailed article an interesting read, it made me think of the possibilities of transforming this very interesting 'what-if' scenario into a board game. Using the British august '42 situation on Malta and the Axis plans for Operation C3, as the plan was named by the Italian high-command, it is possible to form a surprisingly interesting scenario. What would have happened if the Axis had actually pulled the trigger? Well, give it a try!

Axis forces:
  • 5 Italian infantry divisions (sea-borne)
  • 80 artillery pieces (sea-borne)
  • A few dozen Italian assault-guns (sea-borne)
  • An Italian assault-swim battalion (sea-borne)
  • An Italian Marine regiment (sea-borne)
  • 2 Italian para-regiments (sea-borne)
  • 3 German Flieger regiments (air-borne)
  • 2 German Panzer companies (sea-borne)
British forces: 
  • 14 infantry battalions
  • 11 tanks 
  • 2 artillery regiments
The 'what-if'
From 1:00pm on the night of august 15th 1942 the first of two Italian regiments of paratroopers would descend from the sky, soon three German regiments would follow and attempt to set up a perimeter before their seaborne comrades would come ashore. They did not know what to expect when they landed, in fact had the original plan been carried out they had landed on top of the British reserve-brigade. But will the British player position his reserve-brigade on the same spot and where will the Axis player land his airborne-troops.
The same might take place on the “beaches” if Axis intel fails as it historically did. If an Italian division comes ashore directly in front of Fort Campbell on the northern shore of Malta it will be slaughtered.

Axis intelligence on the British troops defending Malta and its position were not very accurate. Thus gathering intelligence on the British strength and disposition can be an interesting addition to the game. Will your paratroopers land on top of a British brigade and be shattered?

But will it be an interesting board game to play? 
As the invasion never took place and so neither of the players is 'in the knows' about what the other will do. As neither side held a decided advantage and there were many aspects which could lead to failure or disaster for either side the game can hang in the balance for quite a long period. The initial invasion might be successful, resulting in a strong bridgehead for the Axis player  but if the Italian navy lives up to its reputation, and scampers after taking a beating, and fails to resupply the ground-forces it might all go awry just as well. Just as well the game might be decided early on for either side by a stroke of luck.

The Royal Navy was not lord and master on the Mediterranean sea, as they would be from '43 onwards, yet. Both players have to decide how to use their naval assets, the Axis has to deter the Royal Navy, stationed in Alexandria, from interfere but will need to support the landings as well.
The British fleet, although much weaker then their Italian counterpart, had two decided advantages, supply and morale. The Italians had to ration fuel and would thus be unable to use their capital-ships much more then a few days, choices will have to be made. Another fragile asset for the Axis player will be the morale of the Italian navy; a series of defeats and their fleet will withdraw to the safety of its harbours.

Malta is a very rugged little island. Landing 100.000+ troops on its rocky shores, as Operation C3 called for, would have been a hazardous and possibly disastrous undertaking. Let alone bringing ashore the German panzers and Italian self-propelled artillery necessary to bring the invasion to a successful end.
Which brings us to another difficult problem for the Axis player: supply. Not only fuel, food and ammunition but water will be in short supply from D-day +1.

The different aspects and phases of a Malta Invasion board game:
  • August 13, 14, 15 Axis intelligence gathering of British troop disposition 
  • August 13, 14, 15 British intelligence gathering of Axis intentions
  • August 13th British-player troop disposition
  • August 15th Axis-player chooses landing beaches
  • August 14 to August 30, Naval Warfare
  • August 15th the battle commences
  • An Italian Navy morale chart
  • Surprise factors for the Axis side
  • Terrain factors because of the rugged terrain


The question: make or not to make?
A bit of research turns up Invasion of Malta: 1942, a small bonus game to Avalon Hill's 1977-title  Air Assault On Crete. It seems however, detail is lacking (Fort Campbell is not on the map) as are many of the important side-aspects of Operation C3. This and the fact it would be hard to find necessitate a new Invasion-Malta board game; I would love to play it for sure.
Avalon Hill's Invasion of Malta: 1942

11/10/10

Finally, after months and months of preparation: reading dozens of books whilst making notes and creating a series of maps to illustrate everything, the time has come to unveil my latest, megalomanic, project: The Civil War Weekly. 
The under-title of the blog says almost everything: A Week-by-Week account; what happened one hundred and fifty years ago during this momentous struggle which pitted brother against brother and shaped the future of the United States.
The American Civil War is very much alive today. And thus I will retrace those events of 150 years ago on a weekly basis. Every week I will write about what happened all those years ago in that week and put it all in perspective. The famous battles we learned about at school are mostly far in between and the periods of inactivity and preparation are very long. At the same time Grant's Overland campaign of 1864 will get another dimension, week-by-week the fighting continued and casualties mounted. The same goes for Sherman's March to the Sea.


Next to retracing the main events I will take a look at the events in the lives of several leading figures, from both sides, as well as some less well known. Amongst others: generals Grant and Lee, Dan Sickles and Stonewall Jackson. But also inventor John Ericsson, intellectual J.J. Pettigrew, private investigator Allan Pinkerton and captain James Wadell.

Well, I am off to write some more and if you are interested, take a look

9/20/10

Napoleon's campaigns in detailed maps

Recently I came across a set of highly detailed maps from the "Atlas to Alison's History of Europe". This atlas was made by cartographer Alexander Keith Johnston (1804-1871) to accompany "Modern History of Europe from the French Revolution to the Fall of Napoleon" by Sir Archibald Alison. Written between 1832 and 1844 the work is according to wikipedia: "one of vast industry, but is extremely diffuse and one-sided, and often prosy." Thus, simply leave Alison's 10 volumn book gather dust and take a look at the accompanying atlast which is wonderful.
All the important and many less well known military campaigns and battles from the French Revolutionary and Napoleonic Wars are mapped by Johnston. Well, take a look for yourself: here you can leaf through the Atlas, and here you can view high-resolution scans of the individual maps. Enjoy!


7/23/10

Gettysburg Battlefield Panorama


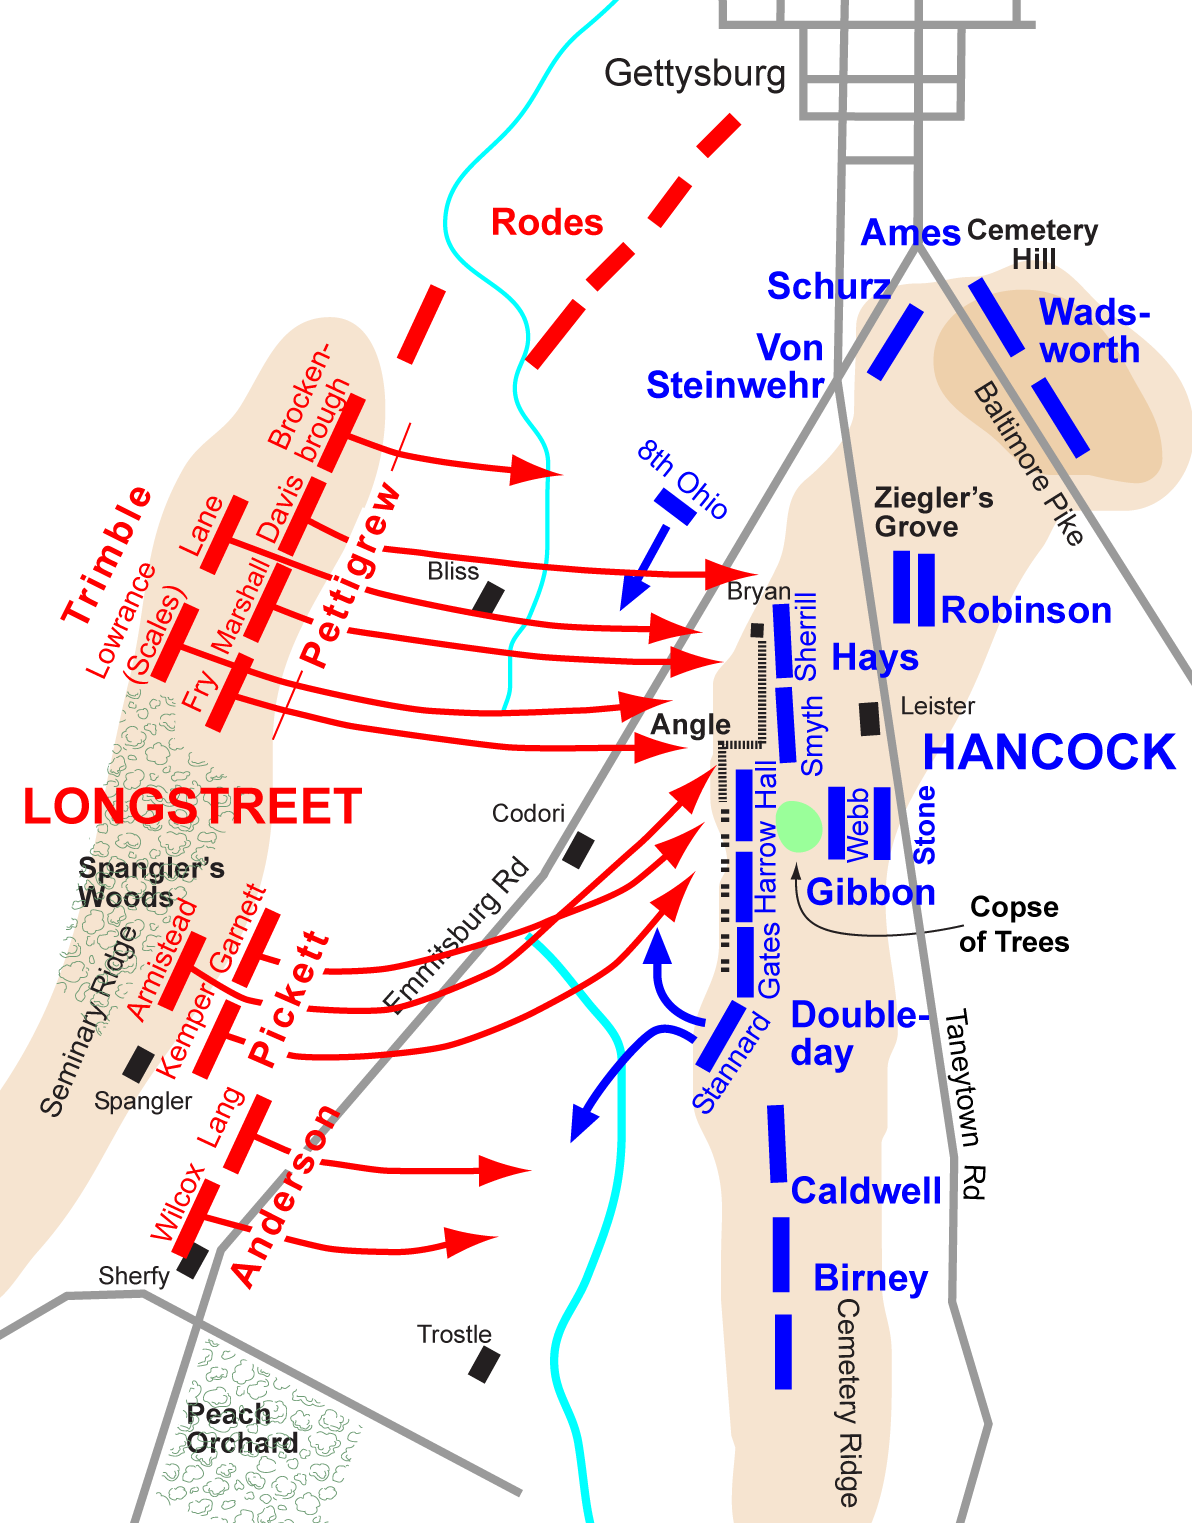
On the afternoon of July 3rd Confederate general Robert E. Lee ordered Pickett's division (amongst others) to attack the Union position on Cemetery hill in an all out effort to break the Union line. After an hour (or more) long cannonade, which achieved little damage as the Confederate artillery mostly overshot, Pickett, reluctantly, sounded the attack and forward went some 12.500 men in what would be later called Pickett's Charge.
Pickett's three brigades came in from the left half of this view, to the left of Codori's farm (the red building) marching obliquely to the wall. Pettigrew's six bloodied brigades came on from the center and right in a straight line. After crossing the wooden fence bordering Emmitsburg road) musket-volley's intermingled with cannon fire and wrecked the attacking formation.
The Copse of trees where the Pickett-Pettigrew charge hit home on the afternoon of July 3rd is on the right of this picture taken at 'the Angle'. This location and moment in history is called the 'High Water Mark' of the Confederacy. It was here Armistead broke through for a moment, raised his hat on his sword and shouted his men on only to be mortally wounded moments later when the Union troops reformed and counter-attacked.
On the right side of the picture we can see the wall making a sharp angle to the right and a few dozen meters to the rear -in front of the markers- the continuatie of the stone wall. It was here Pettigrew's (formerly commanded by Heth) battered division assailed and crossed the wall. And in fact got further then Armistead at the 'High Water Mark'.
Eventually all Confederate troops where beaten back and streamed across the field towards Seminairy ridge. Lee whept and could only mutter "It is all my fault".
Panorama picture taken from The Gettysburg Daily, a great site for information on Gettysburg amongst which dozens of panorama pictures.

7/22/10

World War II in animated maps

There is nothing better if you want to understand the actions and movements in war then looking at a map. Hence I have a shelve full of historic and militairy atlasses depicting wars, campaigns and battles. These days however, there are numerous animated maps to be found online which are quite convenient. They of course don't have the 'depth' of these -quite bussy- maps in an atlas but the animation makes them usefull and very interesting all the same.


For an easy understanding of World War II you can acces a some great maps through the links below.

5/14/10

The Most Iconic Tank in History

Which is the most iconic tanks of history? The mass-produced Sherman or the powerful and frightening Tiger, used time and again in movies art and pictures? Or perhaps neither of these but instead the machine which, debatable, won the war: the T-34?

Where are the other ' monsters of war' on this top-ten list, the Abrams, Mathilda, Stuart 'Honey', the tanks from WWI, the T-60 etc? And what would your list be? Take into account we are not talking about the best but the most iconic tank, a profound difference. 'Iconic' as in, which tank will be remembered from a certain nation and/or timeframe. Which most of the time has nothing to do with the technical quality of a tank.

After an extensive survey and some long discussion we came to a top-ten. Agreeing on the first three wasn't all that hard. Heated discussion started when the Abrams and Centurion had to be placed and about place 10...well, we never reached an agreement.


The Top-Ten Most Iconic Tanks in History

1. Mk VI Tiger (GER)
2. M4 Sherman (US)
3. T-34 (USSR)
4. T-55 (USSR)
5. Renault FT-17 (FRA)
6. The WW1 Mark series (UK)
7. M1 Abrams (US)
8. Centurion (UK)
9. Mk V Panther (GER)
10. Mathilda II (UK)

5/11/10

Napoleon's Veterans Captured on Camera

Early photographs are always very fascinating. There is, for example, a superb series of color pictures from Tsarist Russia at the turn of the century. One of these depicting a splendidly clothed warlord.

If we are looking into military history there are many pictures of interest from the period of the 1850's onwards. During the American Civil War Mathew Brady was especially productive and from this war date the first pictures of real action. Now, don't expect much of them as it wasn't possible to capture movement on the plate in these early photographs. We see however, the smoke hovering over the battlefield at Antietam and the bombardment of a fort. Much more of an impression make the pictures of the aftermath of the battles and those of the veterans.

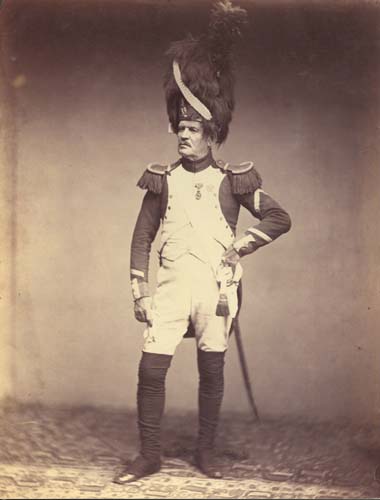
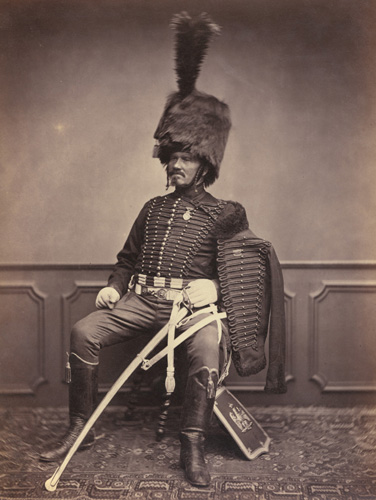
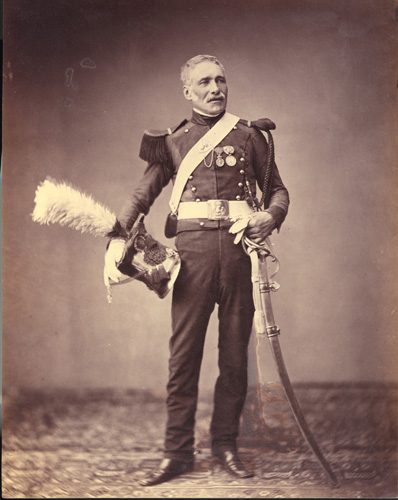
Veterans of earlier wars are photographed as well and there even are some pictures of splendidly uniformed veterans of Napoleon's Grande Armee. A set of pictures depicting fifteen Napoleonic veterans can be found here. These soldiers have probably been photographed in 1858 on the 5th of May. On that date veterans donned their old uniforms and honored their general and emperor at the yearly anniversary of his death in Paris. So most of these men are in their late 60's or seventies.
They are however not the earliest born persons in photos, that honor goes to veterans of the American War of Independence.

Grenadier Sergeant Taria wears a bearskin and the uniform of the Grenadiere de la Garde of 1809-1815.


Monsieur Moret wears the uniform of a grand hussar of the 2nd Regiment, 1814/15. Red pants, green jacket and gold embroidery on the tassel.


M. Dreuse of the 2nd Light Horse Lancers of the Guard, circa 1813-14 wears a splendidly plumed shako.

Twelve more splendid and interesting photographs of the Anne S.K. Brown collection can be found here.

4/1/10

Words of War

In this series of columns we will take a look at words associated with and originated in warfare. Many of these words have found their way into our everyday vocabulary with a different meaning or vice-versa. For the first episode we will look at the grim business of different methods of punishments.

A scene we can easily depict when reading the words is one not put into practice all that often: walking the plank. Pirates sometimes used this harsh punishment but more often marooned those they punished. The word marooning is derived from the term maroon, a word for a fugitive slave.The punishment was meted out by the fellow crew who set the their victim (or victims) on a deserted island, often no more than a sand bar at low tide. He would be usually given some food and water, and a loaded pistol so he could commit suicide if he desired. The outcome of marooning was usually fatal although not so in the case of Alexander Selkirk and famous pirate captain Edward England. In some cases, like that of Alexander Selkirk, who was worried about the unseaworthy condition of his ship, marooning was voluntary, and thus took place under somewhat more favorable circumstances. He later stood model for Daniel Defoe's Robinson Crusoe.

In its glory days the Dutch navy practiced a rather strange method of punishment. Keelhauling, literally meaning "to drag along the keel" was a form of corporal punishment not meant to kill the victim, although when not done right the sailor could drown as a result of being underwater for too long a time.
When a sailor was keelhauled, he would be stripped and tied so that he could not swim. Usually a weight was attached to his legs to pull him away from the ship. The offender was tied to a rope that looped beneath the vessel, thrown overboard on one side of the ship, and dragged under the ship's keel to the other side of the ship.
If the offender was pulled underneath the ship quickly he would suffer severe cuts, bruises and other injuries from the barnacles on the ship's hull. If pulled to slow he would not hit the hull but might drown.
Keelhauling first appeared in 1560, when a Dutch ordinance outlined the practice and the offenses for which it could be used legally permitting its use as a punishment. Other maritime powers including the Britain Royal navy adopted the practice as well. There are also many associations with pirate lore. The Dutch navy did not abolish its practice until 1853.

Today keelhauling is only performed metaphorically altough the term is still occasional used by watersport-enthusiasts. It refers to the spinnaker sheets (parts of the sail) getting stuck under the hull. The social networking site, Facebook, has an English (Pirate) translation that uses 'keelhaul' to mean 'remove' or 'cancel'.
After the Second World War, between August 14, 1946 and May 9, 1947 the allied armies in Northern Italy carried out Operation Keelhaul. The operation's intentions to repatriate Russian captives to the Soviet Union. The term has been later applied as well to other Allied acts of often forced repatriation of former residents of the USSR after the ending of the war. While the original naval-punishment was not intended to kill the offender many of the captives and refugees repatriated during Operation Keelhaul lost their lives through summary execution or during their times in the Siberian camps after returning to their country.

The Spanish horse was a cruel but not widespread torture device. I have seen one in the Netherlands but have also seen a picture of a similar device on a picture from the American Civil War.
Basically, the punished soldier stands over a pointed (but not sharp) beam on his toes. His groin area is exposed to the board and becomes uncomfortable as he shifts from getting tired. This causes his private parts to grate across the board. His hands will be tied to make sure he can't support himself. On occasion wheels were fitted underneath the Spanish horse and it was dragged through town. If that was not cruel enough additional weight could be tied to the offender's feet to make aggaivated his suffering and eventually cut him in two.The Spanish horse was not often used to execute offenders in this way however.
The name Spanish horse comes from the Eighty Years War period or Dutch war of independence. When a deserter was punished with this somewhat less painfully devices in the American Civil War he was said to be 'riding the horse'.

In case of a mutiny Roman generals punished the unit which had performed this unforgivable act by executing every tenth legionair. From the latin verb decimare, to kill every tenth men, our word to decimate was derived. Which in the nineteenth century aquired its more general meaning of 'to destroy a large number of the enemy'.

Sometimes we link a punishment to a certain period in history. The humiliation of tar and feathers is something we know from the American Wild West but in fact this punishment goes back far in history. During the third crusade, in 1189 King Richard the Lionhearted issued a decree in an attempt to twart the increasing large number of thefts taking place during the long journey to Jeruzalem. "Any robber traveling with Crusaders shall be shorn like a hired fighter, and boiling tar shall be poured over his head, and feathers from a pillow shall be shaken out over his head." After Richard I's decree this form of punishment became widespread although you of course wonder how they acquired the tar needed.
During the American Revolution it again became a widespread practice as Colonists used it against the Loyalists. These days we only use it in a figurative manner when we it is used to refer to a severe and disgracefully punishment.

3/22/10

The 'Dandy King's' weakness, a book review

Joachim(-Napoléon) Murat (1767-1815) linked his career with that of the famous Napoleon when on the 13th Vendémiaire he returned to the general with the canon Napoleon fired into the crowd for his 'whiff of grapeshot'. From that moment onwards he was the (soon to be) Emperor's trusted cavalry commander. He led the mounted troops valiantly in countless hardfought battle. From the front, always splendidly uniformed and mounted. A faithful lieutenant through sixteen years of campaigning. Quite the character for a nice biography: Marshall Murat, King of Naples. By A.H. Atteridge.


I have always liked this flamboyant Marshall of France who was rewarded for his loyalty by the Duchy of Berg and later his beloved Kingdom of Naples, Atteridge's book adds to the understanding of character and actions. In his later years, particularly after the failure of the 1812 march to Moscow, he put his own, or actually his kingdom's interests before that of Napoleon and his loyalty suffered for it. Reading about it all you can understand his sometimes stupid and treacherous decisions and feel for him, Napoleon wasn't an easy Emperor and brother-in-law to deal with.
With the same passion he ruled his kingdom Joachim Murat lived, there was his aforementioned flamboyance and his dashing style of leadership. But he was also a gentle and kind man, weeping while reading the letters from his wife, Caroline Bonaparte while on campaign. Something Napoleon moked him for.

After the 1812 campaign all went south, his relation with the Emperor, the rule of his kingdom and the future of the crown of Naples. It was thus after another adventure he was caught leading an abortive and futile 'revolution' on the coast of Southern-Italy. After a quick trial he was sentenced to be shot by firring squad and had but one request: "Soldiers, do your duty. Fire at the heart but spare the face." So he died on October 13th 1815, a bullet nevertheless having shattered his cheek.

There is another fascinating quirk of Joachim Murat I would like to share with you though. This, in the very last pages of the book, made Murat's character shine even more.
During battle he never took his sword from its scabbard (bit of a discrepancy with the first picture there) because, as he himself explained: "What gives me the most heartfelt satisfaction when I think of my military career is, that I have never seen a man fall killed by my hand. [.....] If a man had ever fallen dead before me by my act, the picture of it would always be before me, and would pursue me to the grave."

A second story perhaps even better illustrates the kindhearted man he was, even though he led many a deadly charge and on these occasions did not spare his troops nor the enemy. After a mutiny, the three leaders had been condemned to dead. Murat however, was so impressed by their regret for their misconduct he carried out a sham execution at sunrise. He arranged that the condemned men should fall before a volley of blanks cartridge, and had them covered up by dirt for a while. During the night the three men were removed to a place where they were given disguise and subsequently shipped away from the port.

King-Napoléon Joachim Murat, he knew how to live and "he knew how to die."

- Marshall Murat, King of Naples. By A.H. Atteridge a good but not great book, nice read about the amazing Murat though: 3/5